How Tos - Module
To know what is the role of a module in Snooz, see Technical Overview.
Before creating your own module
- You need to have a properly configured development environment for Snooz.
See Developer Installation for more details.
- Ensure that you have created your repository (e.g., my_snooz_repo) to manage your packages.
See Run Snooz from the source code for more details.
- You have already explored Snooz and have an understanding of its structure.
See Explore examples for more details.
How to create a module
We use a command line tool to help create new modules. To access the terminal in VS Code, make sure to close Snooz beforehand.
In VS Code navigate to Terminal -> New Terminal
Select your repository you forked from snooz-package-template (e.g. my_snooz_repo)
Make sure the virtual environment snooz_310_env is activated (see Developer Installation)
In the terminal type :
python main_utils.pySelect 2- Create a module
Fill the information to suit your design. If you make any mistakes, just repeat the steps and it will ask to overwrite the previous one. If you need more information, see Modules.
As the message in the console mentions, there’s a final step before you can use the module in a process. You need to generate the python files associated with the two .ui files of the module.
In VS Code:
Find the new subfolder of your module in your package.
Right-click on file Ui_[MODULE]ResultsView.ui
Select Compile Qt UI file.
Repeat the process for the file Ui_[MODULE]SettingsView.ui
How to update a module
To modify the behavior of a module, you can modify the compute() function and adjust the module version according to these Versioning Guidelines.
To modify the inputs and outputs of a module, you need to update a few files. For a list of files included in the module structure, see Modules.
JSON file
The JSON file contains all the information related to a module—its name, label, category, inputs, outputs, etc. This is used by Snooz to know what to expect from the module.
Each input or output of the module is defined by a dictionnary as shown below :
name : The name of the input/output
value : The default value of the input (ignored for outputs).
connections : This is only ever filled when a module is part of a process, you can ignore it.
sub_plugs : This is not use yet, you can ignore it.
To add or remove an input/output, simply add or remove a key-value pair from the inputs or outputs dictionary.
For an example of a JSON file, see json file.
Module python file
The main module python file (referred here as [MODULE].py) contains the compute() function and interacts with the inputs/outputs of the module.
To update the inputs/outputs properly you need to update 3 sections:
The init function
The
compute()function parametersThe code of the
compute()function
The init function
In the init function, you’ll have to remove/add the calls to the InputPlug/OutputPlug functions. These function calls are used to register the inputs and outputs to the engine that runs the process.
For example, let’s remove the signal_1 input and add an output called statistics.
def __init__(self, **kwargs):
      """ Initialize ModuleA """
      super().__init__(**kwargs)
      if DEBUG: print('ModuleA.__init__')

      # Input plugs
      InputPlug('signal_1',self) # REMOVE THIS LINE
      InputPlug('signal_2',self)

      # Output plugs
      OutputPlug('signal',self)
      OutputPlug('statistics',self) # ADD THIS LINE
The compute function parameters
To update the compute() function, add or remove the necessary parameters. The compute() function of the class is called when the module is executed within a process.
The parameters should match exactly (and be in the same order) as the inputs defined in the JSON file and registered in the init function.
For example, let’s remove the input called signal_1 and add an output called statistics.
Change this:
def compute(self, signal_1,signal_2):
   ...
   return {'signal': output_signal}
To this:
def compute(self, signal_2):
   ...
   return {
      'signal': output_signal,
      'statitics': some_stats # ADD THIS KEY/VALUE PAIR
      }
The code of the
compute()function
Ensure that you remove any code that references the removed parameter and add the necessary code to handle the new parameter within the compute() function.
Settings View
The Settings View is a user interface (UI) displayed in the Settings tab when the user double-clicks on a module in the process view. It allows the user to interact with the module’s input parameters through a UI. This same view may also be used in the step-by-step interface of a tool. Modifying this settings view will also impact those tools.
For a complete description of the files involved in the Settings View, see SettingsView Info.
This section will outline the checkpoints to update for your module.
Three files are involved:
Ui_[MODULE]SettingsView.ui : An XML description of the UI, edited using Qt Designer.
Ui_[MODULE]SettingsView.py : The python file generated from Ui_SettingsView.ui.
[MODULE]SettingsView.py : The python file that links the Settings View UI to the module inputs.
Add or remove an input
Follow these guidelines depending on whether the input parameter is displayed in the Settings View UI:
To add a new input : Add the input parameter in the UI if it is user-editable.
To remove an input : Remove the input parameter from the UI if it was previously present.
The modifications to the UI are as follows:
Edit Ui_SettingsView.ui using Qt Designer.
Save the changes.
Compile the Ui_SettingsView.py file.
Handling the input parameter from the SettingsView.py :
Add or remove the subscription in the constructor.
Add or remove the call to the publisher in the
on_apply_settingsfunction.Add or remove the ping in the
load_settingsfunction.Add or remove the response to the ping in the
on_topic_responsefunction.
Modifying an output does not affect the Settings View.
For more details about the Settings View, see SettingsView Info and How to design the settings tab.
Results View
The Results View is a user interface displayed in the Results tab when the user double-clicks on a module in the process view.
Three files are involved:
Ui_[MODULE]ResultsView.ui : An XML description of the UI, edited using Qt Designer.
Ui_[MODULE]ResultsView.py : The python file generated from Ui_ResultsView.ui.
[MODULE]ResultsView.py : The python file that links the Results View UI to the module cache.
Modifying an ouput that was displayed in the Results View has to be handled. See How to design the results tab for more details.
How to design the settings tab
The Settings tab is accessible by double-clicking on a module in the process view. It displays a user interface (UI) that allows the user to interact with the module’s input parameters.
For a complete description of the files involved in the Settings View, see SettingsView Info.
Three files are involved in desiging the Settings View:
Ui_[MODULE]SettingsView.ui : An XML description of the UI, edited using Qt Designer.
Ui_[MODULE]SettingsView.py : The python file generated from Ui_SettingsView.ui.
[MODULE]SettingsView.py : The python file that links the Settings View UI to the module inputs.
You need first to decide which parameters the user may be able to edit from a UI. Your module may not have user-editable parameters. The inputs/outputs may be too complexe to be edited manually and must be connected to others modules.
Module without user-editable paramaters
If your module does not have any user-editable parameters, you will need to remove a few lines of code generated by the main_utils.py Python script used to create the module.
The main_utils.py script (see How to create a module) generates a valid Settings View,
but all the fields are defined as user-editable text fields (e.g., the QLineEdit widget from Qt).
Follow these guidelines to create an empty Settings View:
Ui_[MODULE]SettingsView.ui : This file should contain only an empty widget. Delete everything except the main container (i.e.,
QWidget).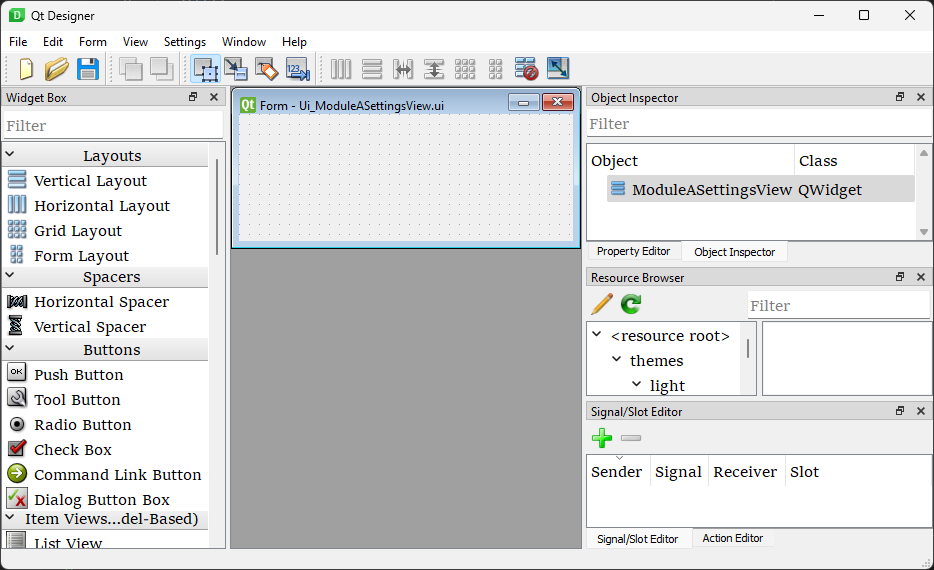
Ui_[MODULE]SettingsView.py : Compile this file from the Ui_[MODULE]SettingsView.ui. Right-click on Ui_[MODULE]SettingsView.ui and select Compile Qt UI File.
[MODULE]SettingsView.py : This class should inherit from
BaseSettingsViewand must implement theon_apply_settingsandload_settingsmethods. However, since you won’t be using these methods, you can simply implement them withpass.from qtpy import QtWidgets from PackageModules.Module.Ui_ModuleSettingsView import Ui_ModuleSettingsView from commons.BaseSettingsView import BaseSettingsView class ModuleSettingsView(BaseSettingsView, Ui_ModuleSettingsView, QtWidgets.QWidget): def __init__(self, parent_node, pub_sub_manager, **kwargs): super().__init__(**kwargs) self._parent_node = parent_node self._pub_sub_manager = pub_sub_manager # init UI self.setupUi(self) def load_settings(self): """ Called when the settingsView is opened by the user Ask for the settings to the publisher to display on the SettingsView """ pass def on_apply_settings(self): """ Called when the user clicks on "Run" or "Save workspace" """ pass
A SettingsView with user-editable parameters
The main_utils.py python script used to create a module (see How to create a module) generates a valid SettingsView.
However, all fields are initially defined as user-editable text fields (e.g., the QLineEdit widget from Qt).
Ui_[MODULE]SettingsView.ui
To configure more appropriate fields, edit the Ui_[MODULE]SettingsView.ui file using Qt Designer. Right-click the file and select Edit Qt UI File (designer) to replace the widgets and define your parameters. Explaining how Qt Designer works is beyond the scope of this documentation, but there are many tutorials available online. You can also refer to the CEAMS packages for several examples: https://github.com/SnoozToolbox/snooz-package-ceams.git. Once you are satisfied with the UI of your Settings View, save the file and compile the Python version. Right-click on Ui_[MODULE]SettingsView.ui and select Compile Qt UI File.
[MODULE]SettingsView.py
You will need to update how the parameters of your new UI are read and written.
The [MODULE]SettingsView.py file generated by the main_utils.py script uses the setText method of the QLineEdit widget to write to the UI and the text() method to read from it.
You will need to update these methods to those appropriate for the chosen QWidget.
For a complete description of the files involved in the Settings View, see SettingsView Info.
How to design the results tab
TODO
How to show information in the log tab
TODO
How to add an option to a module
TODO
How to change the state of a module
TODO
How to add a resource to a module
TODO
How to handle exceptions
In Snooz, when a module is executing we define two types of possible problems:
input problems
runtime problems
The module is responsible for detecting these problems and raise the appropriate exception when they happens.
The classes are imported as below :
from commons.NodeInputException import NodeInputException
from commons.NodeRuntimeException import NodeRuntimeException
NodeInputException
An input problem occurs when an input module is not of the expected type. When this happens, the module must raise a NodeInputException.
A NodeInputException is considered a critical error and will stop the execution of Snooz.
This error typically occurs during the development phase, when the process has not yet been fully validated. It may result from an input parameter being poorly defined or modules in the process not being properly connected.
Once the process is integrated into a tool, any user-editable parameters should be validated before execution begins.
The best practice is to verify the type of the input parameters at the start of the compute() function in your module.
def compute(self, signal_1):
   # Make appropriate checks to input values
   if not isinstance(signal_1, dict):
      raise NodeInputException(self.identifier, "signal_1", "signal_1 must be a dictionary")
The NodeInputException class definition is :
from commons.NodeException import NodeException
class NodeInputException(NodeException):
   def __init__(self, node_identifier, param_name, message):
      super().__init__(node_identifier, param_name, message)
Parameter Definition :
node_identifier: Indicates which instance of a module is responsible for generating the exception, this is useful when you have multiple instances of the same module inside a process.
param_name: The label of the input parameter.
message: The string to be displayed in the log for the user.
NodeRuntimeException
A runtime exception occurs when there is a problem during the execution of the compute() function,
after the initial checks for input validity have passed. When this happens, the module must raise a NodeRuntimeException.
A runtime exception is not considered as critical as NodeInputException, since the error can be caused by the content being analyzed rather than the developer’s code.
If the process is set up to run on multiple files (using a master node), only the current iteration will fail, and the process will continue with the next iteration.
At the end of all iterations, the user will be informed that an error occurred during one or more iterations.
Here are a few examples where your module should raise a NodeRuntimeException:
A file you are trying to open is locked by another software and cannot be accessed.
The file you are trying to read is empty or improperly formatted.
There isn’t enough disk space to save a file.
You lack the necessary credentials to perform an action on the file system.
It is important that the developer catches these errors to help the user understand why Snooz failed to analyze their data.
Here’s an example of how to handle a runtime error in a compute() function:
try :
      dataframe.to_csv(path_or_buf=filename, sep='\t', \
         index=False, index_label='False', mode='a', header=write_header, encoding="utf_8")
except :
      error_message = f"Snooz can not write in the file {filename}."+\
         f" Check if the drive is accessible and ensure the file is not already open."
      raise NodeRuntimeException(self.identifier, "SpindlesDetails", error_message)
The NodeRuntimeException class definition is :
from commons.NodeException import NodeException
class NodeRuntimeException(NodeException):
   def __init__(self, node_identifier, param_name, message):
      super().__init__(node_identifier, param_name, message)
      self.message = message
Parameter Definition :
node_identifier: Indicates which instance of a module is responsible for generating the exception, this is useful when you have multiple instances of the same module inside a process.
param_name: The label of the input parameter.
message: The string to be displayed in the log for the user.
Note
Exceptions are logged automatically by Snooz. You can view the logs by double-clicking on a module and checking the Logs tab, or by accessing the full logs of the run from the Snooz menu: Help -> Logs.
How to run a process over multiple files
TODO
More information about the modules
See Modules.
More information about the tools
See Tools.
More information about the packages
See Packages.