Getting Started with Snooz
The goal of this document is to detail how to download, install and launch Snooz.
Note
CÉAMS members if you need access to the Snooz Toolbox, which supports reading NATUS PSG files (version 9.1), please send an email to snooztoolbox.cnmtl@ssss.gouv.qc.ca—we’ll be happy to assist!
System Compatibility and Requirements for Snooz
Windows
Snooz has been developed and validated exclusively on Windows 11.
macOS
Snooz supports both Intel-based Macs (including those with the T2 security chip) and Apple Silicon Macs (M1 and newer). Supported macOS versions: 14.3 (Sonoma) through 15.2 (Sequoia).
Warning
Make sure to download the correct Snooz installer for your architecture. Two separate links are provided in the email and are clearly labeled: Intel and arm64.
Linux
Snooz is built on Ubuntu 22.04 LTS and tested on Ubuntu 24.04 LTS. It is expected to be compatible with recent Ubuntu LTS versions.
First Snooz installation
The link to download the Snooz installer is provided by email. To request it, please visit https://snooztoolbox.com/ and fill out the form in the Download section, then submit it.
On Windows platforms
Download the Installer using the link provided in the Snooz email after submitting your profile.
Double click on the zip file downloaded.
Double click on the SnoozSetup.exe included in the zip file.
Follow the instructions (make sure the previous version of Snooz is closed).
Warning
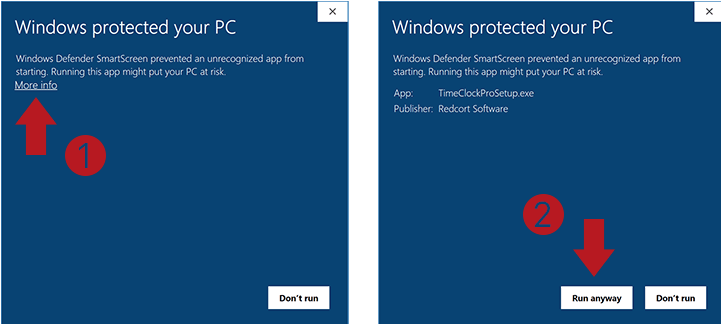
Snooz is not signed yet! If you get this warning below :
Click on More info.
Select Run anyway.
The installation may take a few seconds. When the installation is complete click “Next” to finish the install. Click “Finish”. You are done!
If you encounter issues, see the requirements in System Compatibility and Requirements for Snooz.
On macOS platforms
Download the Installer using the link provided in the Snooz email after submitting your profile.
Double-click on the downloaded file to install.
Drag and drop the Snooz application in the Applications folder.
Since Snooz is not signed yet, you need to mark it as an exception (see the note lower).
Note
- To mark Snooz as an exception:
- Open a terminal and type either :
find /Applications/Snooz.app -exec xattr -c {} \;orxattr -cr /Applications/Snooz.app, depending on your environment.
Warning
Ensure that Snooz has full disk access to launch it from the Launchpad by following these steps:
Open System Settings.
Navigate to Privacy & Security.
Click on Full Disk Access.
If Snooz is not listed, click the + (plus) icon, then select Snooz from the Applications folder.
Click Quit & Reopen when prompted.
Relaunch Snooz.
If Snooz does not have full disk access, it may hang when loading a file chosen via the Snooz interface. Launching Snooz from the terminal provides broader disk access than the Launchpad, so using the terminal is recommended if you prefer not to change the settings.
If you encounter issues, see the requirements in System Compatibility and Requirements for Snooz.
On Linux platforms
Download the Installer using the link provided in the Snooz email after submitting your profile.
Two files are available: a .deb file and a .zip file.
Recommended - Use the .deb file for easier installation (requires admin rights).
Alternative - Without admin rights, use the .zip file.
Recommended - Install Snooz via the .deb file.
Open the installer via the Ubuntu Software Center (or Software Install) and click Install.
Or install Snooz via the terminal :
using dpkg (simple direct installation):
sudo dpkg -i Snooz-Linux-xxx.debusing apt (resolves dependencies):
sudo apt install Snooz-Linux-xxx.deb
Alternative - Install Snooz via the .zip file.
Open a terminal in your Downloads folder and run:
mkdir -p ~/.local/optunzip Snooz-Linux-xxx.zip -d ~/.local/opt/
Note
Use the exact filename of the installer you downloaded.
If you encounter issues, see the requirements in System Compatibility and Requirements for Snooz.
Launch Snooz
On Windows platforms
Type Snooz in the Windows Search.
On MAC platforms
Use Finder to locate Snooz in Applications.
Or, launch Snooz from a terminal:
Standard application launch (may require Full Disk Access):
open -a SnoozAlternative launch method:
/Applications/Snooz.app/Contents/MacOS/Snooz
On Linux platforms
From the Applications menu, click on Snooz.
Or, depending on the installation method, launch Snooz from a terminal:
For the .deb installation:
/opt/Snooz/SnoozFor the .zip installation:
~/.local/opt/Snooz/Snooz
Uninstall Snooz
On Windows platforms
Open the Start menu and click on Settings (the gear icon).
Click on Apps.
In the Apps & features section, scroll down to find Snooz in the list of installed applications.
Click on Snooz, then click the Uninstall button that appears.
On MAC platforms
Open Finder and navigate to the Applications folder.
Locate the Snooz application.
Right-click (or Control-click) on the Snooz application and select Move to Trash from the context menu.
On Linux platforms
If you installed Snooz using the .deb file, open a terminal and run:
sudo apt remove snooz.If you installed Snooz using the .zip file, simply delete the folder where you extracted the files (e.g.,
~/.local/opt/Snooz).
Update Snooz from the interface
Launch the Snooz application already installed on your desktop.
Navigate to the menu Help > About Snooz (macOS : Snooz > About Snooz)
If the installed version is older than the released version download Snooz for your OS.
Close Snooz to avoid errors during the installation.
(Optional) You can uninstall the previous version of Snooz to delete obsolete packages.
Run the installer.
After installation, launch the new version of Snooz.
Activate the latest version of the packages you are interested in. Navigate to File > Settings > Packages (macOS Snooz > Preferences > Packages) in Snooz. Check/uncheck the right versions.
To activate only the most recent version of the packages installed with Snooz, you can press Reset to default in the General Settings.
Warning
CÉAMS members if you need an update for the Snooz Toolbox, which supports reading NATUS PSG files (version 9.1), please send an email to snooztoolbox.cnmtl@ssss.gouv.qc.ca—we’ll be happy to assist!